2010
07.24
While using all sorts of browser plug-ins (java, flash, shockwave, quicktime, silverlight, et cetera) can be extreme helpful and/or even necessary. History has thought us that using them, especially when outdated, can be quite a security hazard (in Dutch).
For us, “power” users, keeping them all up-to-date isn’t too complicated. For “normal” users however this can be quite the struggle. Mozilla has developed a nifty tools that can do all the heavy lifting for them: Mozilla Plugin Check.Using it is as easy as visiting the website and following the instructions. Fully supported browsers include Apple Safari, Google Chrome, Mozilla Firefox and Opera. Microsoft Explorer, due to technical limitations of the platform, has limited. I would encourage everybody to have a look and in particular help to spread the word!

2010
07.24
Last week I created a VMware instance of our online treatment application for developers to work on. Deploying that instance on VMware player for Linux wasn’t a problem, but when doing it on Windows 7 there was a problem with the vmnet8 (NAT) interface. Developers would get networking connection (to the virtual machine), but not from the machine to the internet. After googling for a while I read that Windows 7 isn’t officially supported :-?, nevertheless I wanted it to work. I already noticed that the VMware “Virtual Network Editor” wasn’t present. Having that present, probably would be my best chance to getting a working NAT interface. I read somewhere that however the vmnetcfg.exe is included in the installer, it won’t be installed. Getting it there would involve:
Running the installer with /e option:
VMware-player-3.0.0-197124.exe /e extract
All the content of the installer would then be extracted to the extract folder. After that, open network.cab (using 7-zip) and copy vmnetcfg.exe to your installation folder (typically C:\Program Files\VMware\VMware Player\. Now open vmnetcfg.exe and make sure the NAT interface is configured correctly. You should have internet connection in your virtual machine by now!
2010
07.24
On my laptop I wanted to mount some directories (via samba) from my workstation so I could always access them. That part wasn’t too hard. Be sure to install smbfs (Samba file system utilities) and put the following line in your /etc/fstab:
//zeus/mtersmitten/Muziek /media/samba/zeus/muziek cifs _netdev,credentials=/home/mtersmitten/.cred,iocharset=utf8,ro 0 0
/home/mtersmitten/.cred will contain your samba credentials like this:
username=####
password=####
So the samba path is //zeus/mtersmitten/Muziek and /media/samba/zeus/muziek is the local directory (on the laptop) where we want to mount it to. cifs is the filetype and ro means read-only.
Now comes the annoying part! When rebooting the laptop it would take forever to disconnect the mount(s) and I would get this kinds of errors:
CIFS VFS: Server not responding
CIFS VFS: no response for cmd 50 mid 30
Probably because the wireless connection already was terminated and the smb mount not… Fortunately, thanks to whereofwecannotspeak, I found a solution 🙂
“To unmount Samba shares before shutting down network services, run the following commands as root”
ln -s /etc/init.d/umountnfs.sh /etc/rc0.d/K15umountnfs.sh
ln -s /etc/init.d/umountnfs.sh /etc/rc6.d/K15umountnfs.sh
Et voilà, the errors were gone!
References:
2010
07.24
I wanted to have syntax highlighting for a big SQL file I was working on. Finding a solution didn’t take my too long. Source-highlight given a source file, produces a document with syntax highlighting. Output formats that are supported:
- HTML
- XHTML
- LATEX
- TEXINFO
- ANSI
- DocBook
Input formats that are supported:
- Ada
- Asm
- Applescript
- Awk
- Autoconf files
- Bat
- Bib
- Bison
- C/C++
- C#
- CakePhp templates
- Clipper
- Cobol
- Configuration files (generic)
- Caml
- Changelog
- Css
- D
- Diff
- Erlang
- errors (compiler output)
- Flex
- Fortran
- GLSL
- Haskell
- Haskell literate programming
- Haxe
- Html
- ini files
- Java
- Javascript
- KDE desktop files
- Latex
- Ldap files
- Lisp
- Logtalk
- Log files
- lsm files (Linux Software Map)
- Lua
- Makefile
- Manifest
- M4
- ML
- Oz
- Pascal
- Perl
- pkg-config files
- PHP
- Postscript
- Prolog
- Properties files
- Protobuf (Google’s Protocol Buffers)
- Python
- RPM Spec files
- Ruby
- Scala
- Shell
- S-Lang
- Sql
- Tcl
- Texinfo
- Vala
- VBscript
- XML
- XOrg conf files
Exactly what I needed!
For Debian/Ubuntu get source-highlight to work is just as simple as:
apt-get install source-highlight
And adding these two environment variables (to .bashrc):
export LESSOPEN="| /usr/share/source-highlight/src-hilite-lesspipe.sh %s"
export LESS=' -R '
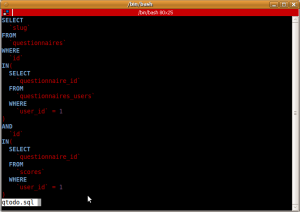
The result looks like this:

source-highlight SQL file
Be sure this line isn’t present in your .bashrc because it will interfere with source-highlight:
[ -x /usr/bin/lesspipe ] && eval "$(lesspipe)"
For CentOS/Red Hat the procedure will be comparable, but I don’t now for sure if a RPM package of source-highlight is available.
References:

